The 10K Zaragoza website project is one of those challenges that gets you excited from day one. The base of the website was already designed by another development team, but the company Corre en Zaragoza hired me to join the technical team with a very clear goal: give it an extra layer of interaction and surprise the user.
How did we achieve that? It all started, like the best ideas, with a round of questions and a joint brainstorming session. Each team member brought their vision and proposals.
For my part, I've always dabbled in the 3D world. Years ago I used to work a lot with 3D Studio Max, so when my turn came, I had it clear: what if we add an interactive 3D viewer of the official t-shirt directly on the website? The proposal fit perfectly and the team thought it was an incredible idea.
Going back to the origins: From 3D Studio Max to Blender
With the team's green light, I got to work alongside the design colleagues. My first stop was Blender. I had to dust off knowledge that I hadn't used in years. It was a nostalgic but intense process, remembering how the basic pillars of the three-dimensional world worked: positioning the camera, configuring the lights, working with textures, materials, and motion in the scene.
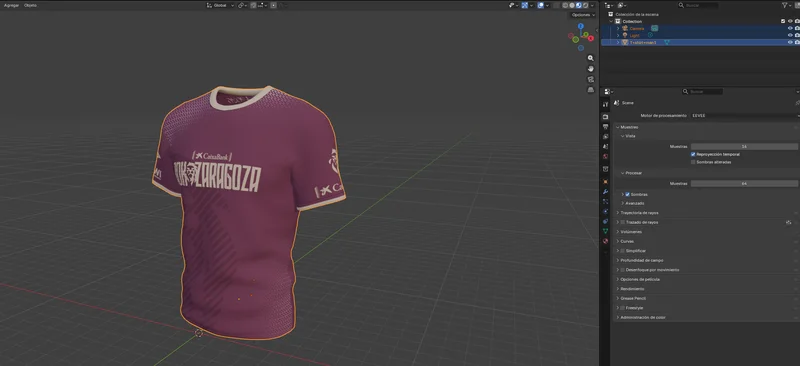
I took a specific object to serve as the base for our t-shirt and began applying materials to achieve the realistic finish we were looking for.
From Blender to the Web: The magic of Three.js and React
While I was fighting with vertices and textures in Blender, I started working on the code. The goal was clear: take that model and render it in the browser, giving the user the ability to interact with it.
I started by testing the model 'naked' (without complex textures or dynamic lights) using Three.js, the standard library par excellence for 3D rendering on the web. However, since we were working in a modern React environment, I soon made the jump to React Three Fiber (R3F).
This is where the technical experience became really interesting. One of the biggest challenges was changing my way of thinking. If you are interested in the more technical side of this paradigm shift, I recommend reading my article on React Three Fiber and Declarative 3D Programming where I explain the differences with Vanilla Three.js.
But to give you a quick idea of how elegant and declarative it is to work with R3F, this is a small snippet of how the scene is built:
<Canvas>
  <ambientLight intensity={1.2} />
  <RotatingLights />
  <Suspense fallback={<Loader />}>
    <ModelFactory url="/models/t-shirt.obj" color={selectedColor} />
  </Suspense>
</Canvas>
Page Architecture and Optimization (TShirt3DPage)
To release this development to production on the official website, we couldn't just dump the 3D renderer onto the screen. A 3D viewer loads heavy scripts and geometric models that can ruin loading performance (First Contentful Paint) and SEO if not structured properly.
Therefore, we implemented a decoupled structure with key optimizations:
1. Dynamic Lazy Loading of the Scene
The main page component (TShirt3DPage.jsx) imports the viewer dynamically. This way, the browser prioritizes downloading the structured HTML and SEO tags (handled with react-helmet-async) before loading and initializing WebGL:
// TShirt3DPage.jsx - Dynamic Import
const TShirtViewer = lazy(() => import('../components/3d/TShirtViewer'));

export const TShirt3DPage = () => {
  return (
    <>
      <Helmet>
        <title>Official T-Shirt 3D - 10K Zaragoza 2026</title>
        <meta name="description" content="..." />
      </Helmet>
      {/* The viewer is only mounted if it is visible and deferred */}
      <Suspense fallback={<Loader />}>
        <TShirtViewer color="#ffffff" />
      </Suspense>
    </>
  );
};
2. Scale Normalization and Automatic Positioning
Since designers model at arbitrary scales in Blender, we programmed an analyzer (SceneProcessor) that reads the real geometric bounding box of the model to automatically scale and center it on the screen, regardless of its original export size:
// SceneProcessor.jsx - Automatic Centering
const { positionOffset, scale } = useMemo(() => {
  scene.updateMatrixWorld(true);
  const box = new THREE.Box3().expandByObject(scene);
  const center = new THREE.Vector3();
  box.getCenter(center);

  const size = new THREE.Vector3();
  box.getSize(size);

  const maxDim = Math.max(size.x, size.y, size.z);
  const targetSize = 2.2; // Ideal scale for the browser
  const modelScale = maxDim > 0 ? targetSize / maxDim : 1;

  return {
    positionOffset: new THREE.Vector3(-center.x, -center.y, -center.z),
    scale: modelScale
  };
}, [scene]);
3. Dynamic Studio Lighting
To make the t-shirt look premium and not "flat", we created a set of counter-lights (RotatingLights) that rotate constantly on each render using useFrame, highlighting the textures and shadows of the fabric's wrinkles:
// Rotating lights component in TShirtViewer.jsx
function RotatingLights() {
  const groupRef = useRef();

  useFrame((state, delta) => {
    if (groupRef.current) {
      groupRef.current.rotation.y += delta * 0.4; // Soft perpetual rotation
    }
  });

  return (
    <group ref={groupRef}>
      <directionalLight position={[4, 2, 4]} intensity={3} color="#C4AA93" /> {/* Gold */}
      <directionalLight position={[-4, 1, -4]} intensity={5} color="#5A2030" /> {/* Maroon */}
      <directionalLight position={[0, 4, 0]} intensity={3} color="#ffffff" />
    </group>
  );
}
4. UX on Mobile Devices: Interaction Locking
On small touch screens, dragging a 3D model can trap the user inside the viewer, preventing them from scrolling down the page. To solve this, we created a manual activation layer: by default, the Canvas has touch events disabled (pointer-events-none) and displays a translucent overlay to activate it on demand.
// Conditional interactive gesture structure in TShirtViewer.jsx
const isInteractive = !isMobile || isActive;

return (
  <div className="w-full h-full relative">
    <div className={isInteractive ? 'pointer-events-auto' : 'pointer-events-none'}>
      <Canvas>
        <OrbitControls enabled={isInteractive} />
      </Canvas>
    </div>
    {isMobile && !isActive && (
      <div className="absolute inset-0 bg-black/10 flex items-center justify-center">
        <button onClick={() => setIsActive(true)}>Activate 3D View</button>
      </div>
    )}
  </div>
);
Technical Challenges and Solutions
To take the t-shirt experience to another level, we implemented several key solutions:
- Dynamic Scaling and Centering: In 3D, exporting a model at the perfect scale for web is difficult. We programmed a processor (
THREE.Box3) that reads the mathematical 'box' enclosing the t-shirt and scales it automatically so that it always frames perfectly on the user's screen. - Dynamic Materials: The user not only rotates the t-shirt, but the web applies the color in real time. R3F allows us to connect the React state (e.g., the selected color) directly to the properties of the t-shirt's
MeshStandardMaterial. - Dynamic Studio Lighting: To prevent the fabric from looking 'flat' and make it look like a premium product, I created a rotating lights component. A set of directional lights (gold, maroon, and white) that rotate perpetually around the garment, highlighting its wrinkles and texture like in a real storefront.
Conclusion
The true value of bringing 3D to the browser does not lie only in the visual spectacularity, but in maintainability and workflow. Tools like React Three Fiber allow us to handle complex Three.js scenes with the same ease with which we manage the state of a button or a modal in React.
The greatest learning from this project has been confirming that the bridge between pure design (modeling and texturing in Blender) and declarative programming is finally unified. Adjusting dynamic studio lights, injecting colors in real time, or recalculating the scale of the model to fit the screen no longer involves dealing with obscure DOM mathematics; it is simply a natural extension of our UI.
Creating this interaction for the 10K Zaragoza has shown me that the real evolutionary leap in current web development is being able to offer an immersive product experience without sacrificing performance or code cleanliness. And seeing the user play with the garment on the screen is priceless!